Overview
Xero uses an industry standard method of securely connecting WooCommerce which is used by many companies including Google known as OAuth2.0. Xero has an Application Programming Interface (API) that handles the external calls into and out of Xero. The connection is managed in your Xero account using a private application which generates the credentials or keys that are used by Xeroom to authorise the connection. Multiple sites can be mapped into one Xero application.
Connection Security – The OAuth2.0 Protocol
Xeroom uses the Xero API to make communication calls into Xero from WooCommerce using the OAuth 2.0 protocol which is the industry-standard protocol for authorisation. Oauth2.0 uses a very secure protocol called Transport Layer Security. TLS is the cryptographic protocol that provides end-to-end communications security over networks and is widely used for internet communications and online transactions. It is a standard intended to prevent eavesdropping, tampering and message forgery. Common applications that employ TLS include Web browsers, instant messaging, email and VOIP. TLS 1.1 is used by most browsers TLS1.2 is a stronger protocol now enforced for card transactions and we also use it for Xeroom.
The secure pipeline for the messages is setup using a Client ID and a Client Secret which are known as credentials both of which are cryptographically generated by Xero in the App:
- The Client ID is a public identifier for apps. Even though it’s public, it is best that it isn’t guessable by third parties.
- The Client Secret is a secret known only to the application and the authorisation server. It is hidden by Xero once saved and so no longer viewable but can be deleted and a new one created.
Step 1 - Create a New Private Application in Xero Developer Centre
Connections into Xero are managed via Private Applications at the Xero Developer Page. First log in to your Xero account at: http://login.xero.com and go to the Developer Centre https://developer.xero.com/myapps where you will see a list of all your connected apps if they exist. Select New App on the top right hand side. You will get the screen below, so enter the details as below.

App Name – Whatever you want to call your app – It cannot have the word Xero in so I suggest that you use XRM as short for Xeroom instead.
Integration Type – Web App
Company URL – https://www.yoursite.com
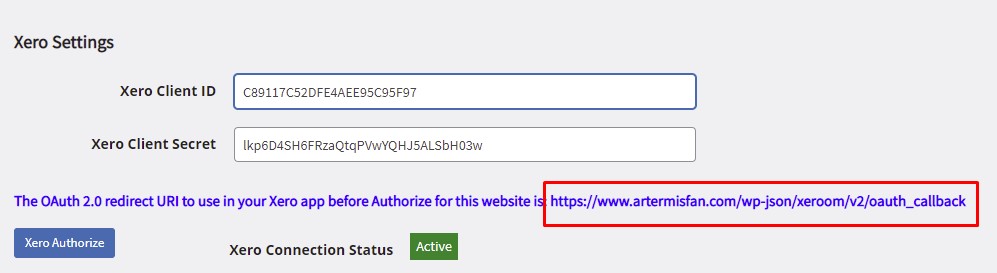
Redirect URI – Take the URI that Xeroom has created for you based on your permalink structure and shows in the Xeroom/Settings page.
NB: The URI Format MUST BE CORRECT TO WORK
Tick the terms and conditions box and click on create app. The new app should appear although sometimes your screen will appear to hang with a spinning ball so after 20 secs just refresh your page and your new app will show.


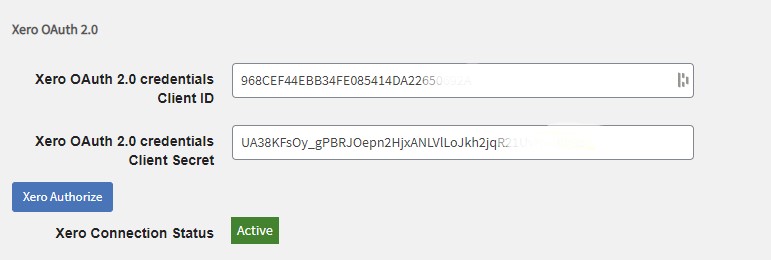
After clicking create app you will get the App details page for your new app. Select Configuration on the left hand side. Here you can add extra URIs, find your Client ID and generate your Client secrets. The Client ID and secret are your two credentials that need to be cut and pasted into Xeroom using the copy buttons. The secret will be not be copyable again once you leave this page but you can create a new one if you return to this page or need another one as multiple secrets are allowed and continue to work until deleted.

Mapping Multiple Websites to Xero – You can use the app you have just created to handle the mapping of multiple websites into your Xero account. Simply add the new URI for the additional website into the Xero App and use the same credentials with a new secret if necessary in your new website. Please order a separate Xeroom licence for the additional website.

Step 2 - Add Your App Credentials to Xeroom
Copy and paste both these credentials into your Xeroom settings. Also keep a copy in case you need them as your Client Secret will not be visible in your Xero App again. You can generate a new one if you need it though. Then scroll down and click on Submit to save them.
Step 3 - Connect Xeroom to Your Xero App & Organisation
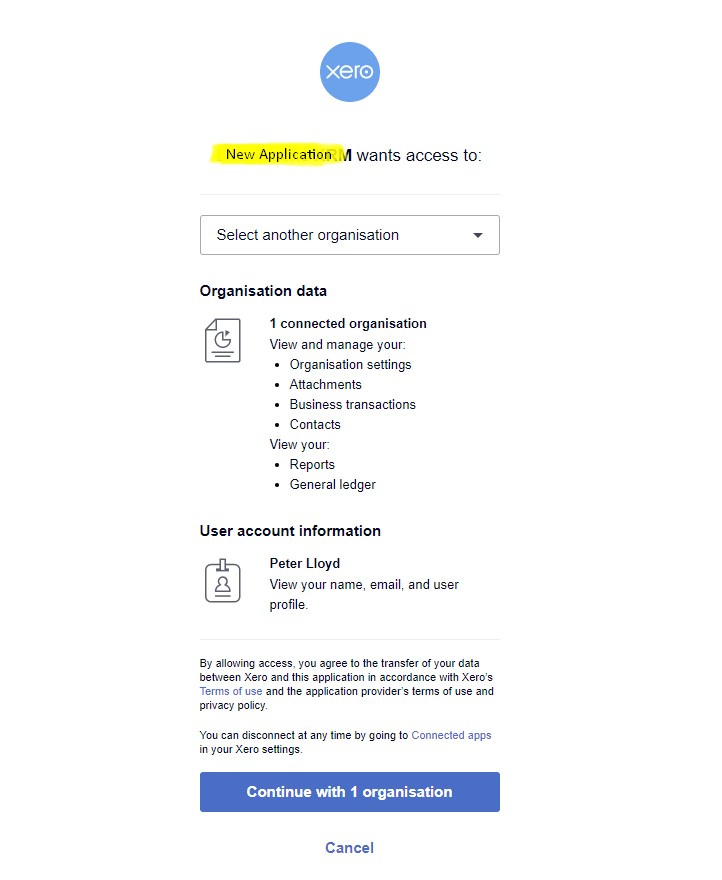
Scroll back up and click on Xero Authorize. Xeroom will then attempt to connect to your new app. It will come up with a new screen with your newly created app from the previous step. It will ask which Xero organisation you wish to connect your app and allow access to. You can select the organisation from the drop down list and list any existing connection at the bottom. You can also disconnect from an organisation here too. If the connection is successful then it will take you back to Xeroom and the Xero Connection Status will show green.
Troubleshooting OAuth2.0 Connection Errors
If you get a general 500 error screen then it means that you are not connecting or to be exact, your server is not connecting to Xero’s server. The steps below resolve this error 99% of the time.
Please check the following:
- Are your URI settings correct? They must be identical to that given in the bold blue line in your Xeroom/settings.
- Generate a new secret and a new client id in the Xero app. NB: Ensure that you save these credentials in the Xero app and copy and save them in Xeroom too. This generates a new token which sometimes time out or expires and has to match the one in Xero for authentication.
- Try deleting your Xero app and recreating it again in Xero.
- Xeroom uses wp-json which is the REST API for your site. It is a virtual address and the status can be checked by going to tools/site health. Some plugins do disable the Rest API and it has been known to be left out of the php modules in a server build so do ensure that it is there and running properly.
- Check that you don’t have another Xero app with the same name or that you have exceeded your limit of apps which is 2 unless they are large Xero “certified” ones. Xeroom isn’t classed as “certified” as it uses Xero’s API connection, which is what they recommend for small apps.
- Check that the Xero permissions of the person who made the Xero App have not been changed or deleted by the Xero admin user.
- Check your WP error log in the WP-Content directory (you will need to set WP Debug to on in your wp.config file for the log to be created). This should reveal any conflicts that occur with other plugins. If you find one then please cut and past the error stack and send it to us to fix.
- As an alternative to the previous step look for likely plugins that would be conflicting with it and disable them – or quickest is to disable all of them and see if it clears.
- Check your firewall for possible blocks or a changed or alias URL for your website.
- We cannot troubleshoot your settings as there are no special tools available to us and so cannot help but you can ask Xero support. Make sure you supply them with the Xero user and Xero app details that you created. You can pass any response onto us for assistance.
- Xero support info for further suggestions https://developer.xero.com/documentation/oauth2/troubleshooting. We cannot troubleshoot your settings from the Xero side as there are no tools available to us but Xero support can if you supply them with the app details you used to create it on a support ticket.
- Check with your host for any irregular server setup issues. Check that your php (we don’t support version 8), WordPress and Woocommerce versions are up-to-date and current.
The above steps fixes 99% of the connection issues. If this is not the case then there is something more in-depth. We can look into it and review what you have found – so please open a support ticket and copy the answers to the above 12 troubleshooting checks along with any info from Xero support, your WooCommerce error logs and any Xeroom debug messages. Without this information we will not be able to assist you.
Was this article helpful?
That’s Great!
Thank you for your feedback
Sorry! We couldn't be helpful
Thank you for your feedback
Feedback sent
We appreciate your effort and will try to fix the article