First Install Xeroom & Connect to Xero
If you have not installed Xeroom please follow the installation instructions in our knowledgebase to load it and then create your connection-to-Xero. Then come back here to configure your settings.
Setup - General Settings Tab
Invoice Numbering – You can set your invoices to be created in Xero with an invoice number from a number of methods.
- Xero Numbering – This will just follow the Xero invoice no sequence with the next one.
- WooCommerce Order No & Prefix – This will use the WC order no and can be used with or without a prefix and an optional start number. If you are not using the Post ID for the order number (eg if you have the WC Sequential Ordering plugin active) then you will need to use the Custom option instead.
- Set Start No Beware: - If you set this with no prefix then there is a risk of conflict in Xero if you already have invoices with the same numbers as your order numbers (either active or archived) which will generate an error. To be safe either use a higher start number point than already exists in Xero or don't apply this constraint.
- Custom Number – This is picking up a number to use from another plugin such as a PDF Invoice No plugin or a sequential order number plugin. The setting here is the field used in your postmeta data table that holds the third party plugin’s invoice number. For full details on how to find the correct setting for this please refer to this user guide.

Invoice Reference Prefix – The prefix you want to be placed in the invoice reference field in Xero. It can be:
- WooCommerce Order Number – to enable any orders from WC to be identified easily in Xero by the invoice users, customers or bookkeepers when doing the bank recs.
- Add Prefix and Gateway – This enables any reference to be prefixed and also the payment gateway that was used to be added.
- Custom Ref – If the order no is set by another plugin such as PDF Invoice or Sequential Order No then tick this box and add the actual value in the box above for Custom Meta Invoice No as detailed in this user guide .
- Include Payment Ref – The last 7 digits of the payment reference can be added – again useful for bank reconciliations.
- Add Customer Name
- Purchase Order No– This enables a PO number to be used. It is captured at checkout time using a PO gateway by this plugin https://en-nz.wordpress.org/plugins/purchase-orders-for-woocommerce/ which also has some other useful features.


Account Settings
Account Selection & Validation – When you first connect your site to your Xero account all of the accounts from your chart of accounts will be loaded into the drop-down pick lists of Xeroom. This makes it easy to pick and set your accounts without having to keep referring back to your Chart of Accounts in Xero. They can be refreshed by simply doing a reauthorize. We have limited the account list to only show valid account numbers and account types for each setting thus avoiding errors in posting orders into Xero. Also the tax settings are populated with drop-down lists of available and valid methods from Xero to pick from. If the list is not showing then check that your connection to Xero is working by looking in the Xeroom debug screen.
Beware: If you have multiple people able to edit and change your Xero settings they will not automatically change in Xeroom and will need to be manually changed otherwise it will cause errors. You should prevent this by having one system owner who manages Xero, Woo and Xeroom and controls what is changed or alternatively put a formal “Change Control” process in place. To be sure look in the Chart of Accounts in Xero and ask your bookkeeper or accountant to double check these.

Stripe Fees Expense Account – Set the overhead or expense account that you want the Stripe fees deducted by Stripe on any payments, to go to. For full details of this feature please see Stripe Fees setup.
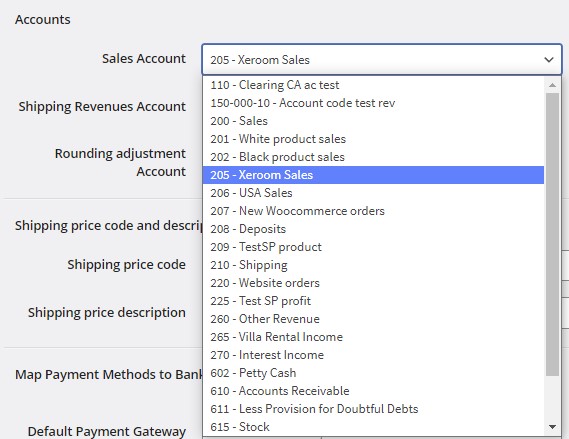
Sales Account – This is the default account to which the sales are posted. This is usually a 200 series account in Xero but will depend on your exact Chart of Accounts (COA) design. The list is populated with all accounts of type Sales and Revenue from Xero along with Current Assets which might be used for bulk orders that are not released into the Revenue account immediately.
Shipping Revenues Account – If you wish to break out this revenue then set this to map to a different account otherwise leave it the same as the Sales Account ie 200. This is the account that any revenues charged to customers for shipping is posted to and is type Revenue in Xero. It is NOT the expenses account that your carriers costs are posted to. You will need to create a new one in Xero for say 210 as it is not setup by default.
Rounding Adjustment Account – This is the account to which any rounding adjustments are placed in Xero. Leave blank for the default to be used.
Shipping Price Code & Description – This is to set what product code and description are used in the Xero invoice for the shipping revenues line.
Map Payment Methods to Bank Accounts – All the Payment Gateways that you have set in WooCommerce will be listed in this section and can each be individually mapped into different payment accounts in Xero. Select the relevant bank account from the drop-down list. If none are showing then refresh the list by doing a reathorise of the app.
Payment Send Trigger - For each payment gateway you can set the payment send trigger ie on order status change to Processing (ie when payment is received or intent to pay which is what most people use) or on Completion (ie once the order has been processed and is ready to ship or else shipped)

Clearing Accounts – Payments can also map into any clearing accounts that you use. They can either be a creditor/current liability type, current asset type account or a bank account and can be the same one that you receive live feeds into. If a creditor ac is used then it MUST have “Enable payments to this account” set in the settings otherwise payments sent will fail. NB The special Xero Accounts Receivable account with code 610 (which is a Current Asset type ac) cannot be used as a clearing account since it doesn’t permit payments from outside of Xero into it.
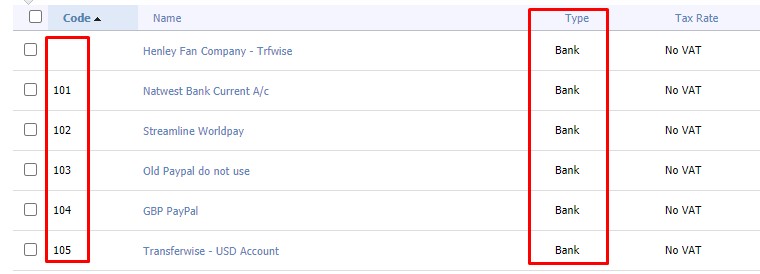
Ensure that the "bank" accounts in Xero have account codes as these are needed by Xeroom - they don't have them by default but can be easily added in Xero under the Chart of Accounts - see example below.
Benefits of adding the payments – Are that invoices get set to Paid status in Xero if an instant payment method is used eg card, Stripe or Paypal and the invoice can then be automatically emailed to the customer from Xero on checkout. It also makes the bank reconciliations easier as automatic matching of actual payments into the bank account against the sales transactions are easier and any queries which arise especially around consolidated or bulk payments can be quickly resolved especially if the payment reference is used.
Send Payment Automatically – This allows an overall setting of payments sendings which must be set to Automatically for the above Map Payment Methods to work. If set to manual then they can only send when you either send one by one using the blue bottom right button on the orders or a Bulk Send by ticking the boxes.

Inventory Asset Account – The account that holds your inventory transactions in Xero. It is a special account type “inventory” The default is usually 630. It should be present even if you are not using inventory as Xero uses it. Different groups of inventory can be given different IAA’s which is useful for reporting and knowing where the value and movements in the stock resides.

Cost of Goods Sold Account – This is the account where the costs of goods sold (COGS) for any sales made is posted to. It applies the cost of the product as set in Xero to the sales posted in the invoice to create an entry in this account. The default is usually 310.

Synch Inventory Master – If you are going to synch your inventory then here you set where you want the inventory master to be. This setting is for an inventory check during checkout to ensure that you have sufficient stock to sell. If you don’t then the automatic posting of the invoice will no take place since Xero will not permit the inventory to go below zero so no back orders are allowed whereas in WooCommerce they are. Sales will affect the master directly and the resulting balance flushed to the slave as sales take place. Inventory synch uses the SKU’s. There is also a timed global synch of all inventory for all products on the Global Inventory Synch tab which can be almost real time ie every 5 minutes. See below.
Product and Price Master (removed) – The products from orders on Woocommerce have SKU codes that link to Xero. This sets where the prices and descriptions that appear on the invoice in Xero are taken from. If a product doesn’t exist in Xero then Xeroom will create one using the SKU from Woocommerce or if that doesn’t exist then the Product ID. In some instances prices and descriptions need to be taken from those in Xero rather than WooCommerce and this provides the option to do so.
Create Invoices as Draft or Awaiting payment – Do you want to create the invoice as a draft status which needs to be authorised or as awaiting payment which is approved but can still be edited and voided. The next stage in Xero is paid which cannot be deleted as the payment and other book keeping entries have been made. The only option to remove it is to reverse it by creating a credit note.
Set Invoice Creation Date – This will set the date of the invoice accordingly. If your process is to produce goods before invoicing for them then the date of posting would be better and use the Send trigger as order Completion.
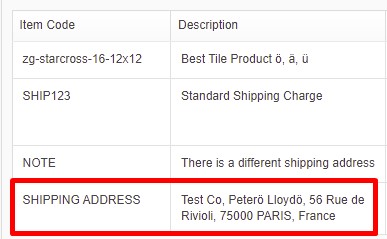
Send Invoice Delivery Address – Xero has no editable fields to place the delivery address if different to the billing address. To work around this we have provided the option to take the delivery address (when different) and post it onto the invoice as an invoice line. You do have the invoice quantity and price boxes to fill with zeros which looks a little untidy but until Xero permit custom fields this is the best we can do as it is a common requirement for many businesses that ship physical goods to have different shipping addresses.
Post Credit Note When Order is Cancelled – Do you want a CN to be automatically generated in Xero once an order is cancelled in Woo?
Send Credit Note Status as Draft/Approved – Set the status of your credit notes that get generated.
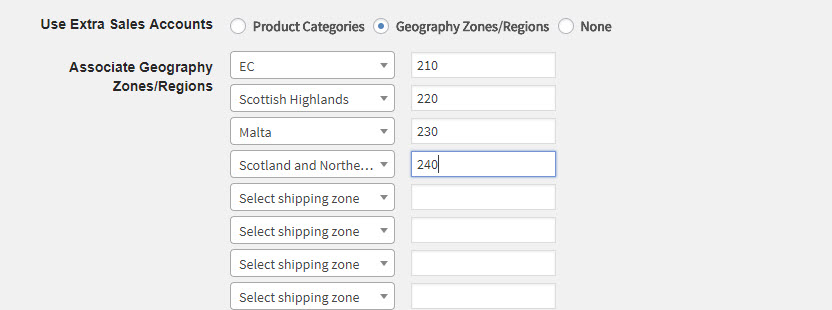
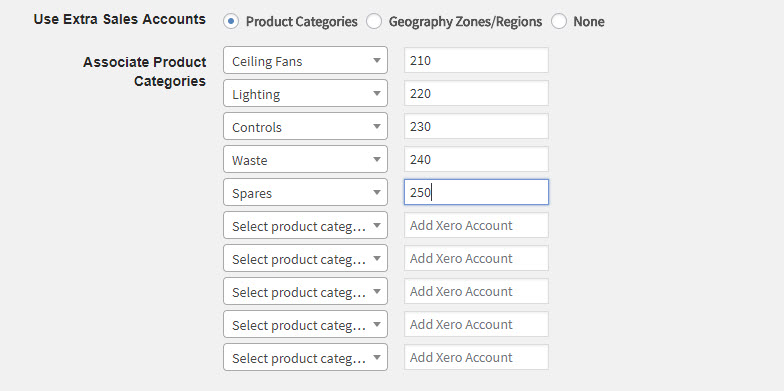
Use Extra Sales Accounts – Do you want to be able to break-down sales in Xero by geography or by product category? With geography the idea is to use broad zones such as countries or trading blocks such as EC. For products this is intended for groups of products that already exist as categories in WooCommerce that can be mapped into specific Xero sales accounts.
Note: Only the top level children of your categories are shown but will apply to all the descendants under that category. eg clothes will take in clothes/shirts, clothes/shirts/short sleeve etc. This mapping takes priority over the default sales account that is set above. If you wish to map sales accounts (and other attributes such as COGS) at a product level then please see Product Level Mapping below.
Make sure you create the separate accounts in Xero and then use this option to map them.
Note: Xero doesn’t support sub-accounts so your numbering logic needs to cover for this. It is not possible to mix and match geographies and categories. You can have as many separate accounts as you want for each.
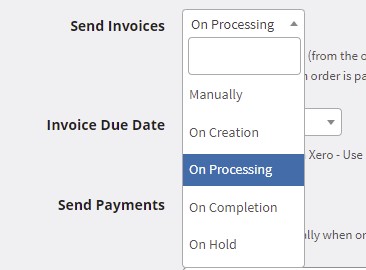
Send Invoices – Here the trigger is set to send the orders and create new invoices in Xero. This can be manually using the button in the order or bulk send or on one of the key WooCommerce order status changes that occur in the order process. These are on order creation, order payment (status changes to “Processing”), on hold or on completion. Most people use On Processing ie the order is paid or intent to pay is created.
Invoice Due Date – Set the invoice due date used by Xero on the invoice. The default is the Xero default which is 3 days. The maximum custom setting is 30 days.
Send Payments – Set the trigger to send the payment to Xero. They can be sent automatically (auto complete) when the order is paid for ie WC order status changes to “Processing” or manually. Manual means using the button in the bottom right of the order or by using bulk send option on the order dashboard. Further granularity of choice of automatic is offered by the tick boxes against each payment gateway – so some can be automatic and some not.
Note: Xeroom doesn’t complete the order in Woocommerce but leaves its status as Processing and so is really autopay.
Auto Complete implications in Xero – If payments are posted automatically to Xero once payment is confirmed by card or PayPal it means that instead of appearing as invoices Awaiting Payment status in Xero (which can be further edited) they will appear as Paid status invoices which cannot be changed.
Tracking Categories – Set WooCommerce to use any tracking categories (2 max are allowed in Xero) that you have created in Xero eg Brand, Branch, Dept, Cost Centre.

Once set here then they will appear in the product details with a drop-down selection box to set the category for each product eg below is an example with Brands.

The tracking categories will then appear on the invoices and be available for reporting in Xero. Separate your values by a comma.
![]()
For more details see this article https://support.xeroom.com/support/solutions/articles/77000565966-how-to-set-up-posting-of-xero-tracking-categories-from-woocommerce
No of Orders Sent on Bulk Request – This provides control of how many orders are sent to Xero at once. Xero has strict limits on the amount of data and calls to the API that can be made in one go so if you find that the Bulk Send options are not working or that you have very large orders (ie larger than 10 line items per order) try reducing this. A lower number will slow it down but avoid errors on submission to Xero and vice-versa. The default is 4. You can try increasing this if your invoices are small and want a faster speed of bulk send.
Xero Address Mapping – Set which address to use on the invoice. Note if you use the Company Name and it is blank on an order then Xeroom will use the Contact Name instead which is useful if you are selling to both B2B and B2C customers.

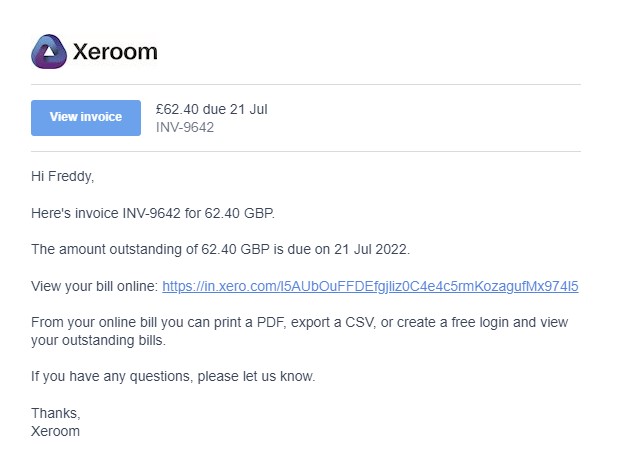
Send Invoices – You can set your invoices to be emailed directly to your customers from Xero. They can be unpaid which is useful for B2B where the account is paid at the end of the month or as paid invoices.
Unfortunately they cannot be sent as PDF attachments but it offers a cleaner experience for customers and is also useful for using a Payment on Account process with B2B customers – for further details see https://www.xeroom.com/payments-on-account-b2b-purchase-orders-in-woocommerce/. If an invoice has been sent from Xero in this way then the WooCommerce Order Dashboard gets changed to a blue outline on the Xeroom Status.

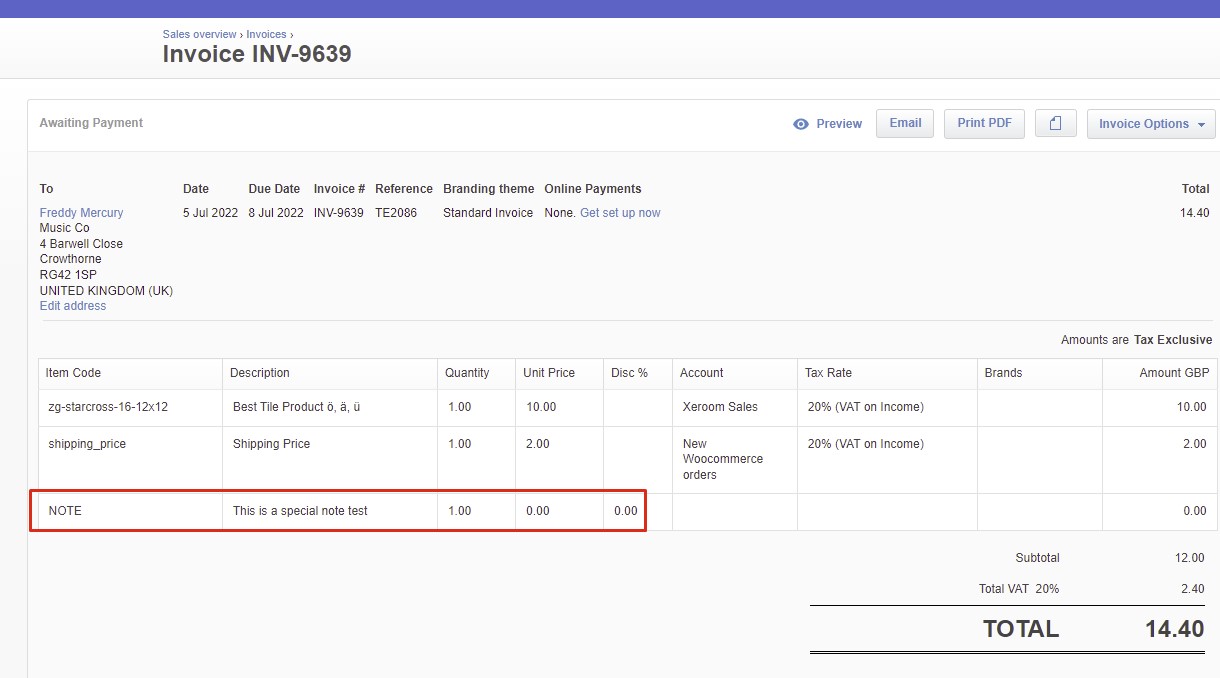
The Xero invoice that the customer receives looks like this:
Send Order Notes – It is useful to be able to show any note that the customer places on the order at checkout time onto the invoice. Again Xero doesn’t allow custom fields on the face of the invoice so we have made a work around to show it as an item.

Autocompletion of Orders - This will automatically set the WC Order Status to Completed once both the order and payment have been posted by Xeroom. This is very handy especially for virtual products where there is no delay between Processing (payment made) and Completion.
We have added with options for virtual and downloadable products only which means that if you sell both physical and digital products you can continue to leave the physical ones uncompleted since further processing usually needs to take place with those.

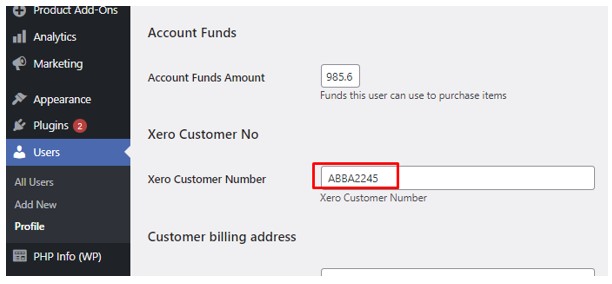
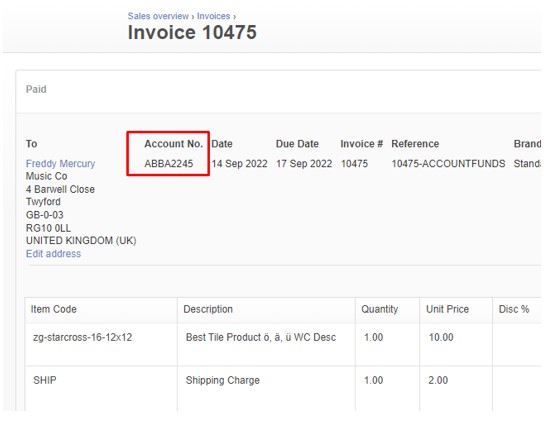
Customer Account Numbers – These can be handled in two ways. Firstly, Xeroom adds a custom field on the User details in WordPress which can hold a Customer Number. When the user places an order this will added to the face of the invoice and stored in Xero.
Secondly, a metakey can be added if you are using a plugin to handle customer accounts. Once set Xeroom will pick up the relevant user account number and post that into Xero on the invoice and against the Xero customer details. Insert the meta key that the other plugin uses to store the client id number eg woo_client_number.
To find the meta key you need to browse the user_meta or order_meta tables to find the relevant field, the normal one to use is xero_customer_no. Make sure that you use the exact spelling as it used in your database tables, a snippet of the wp_usermeta table is given below so you know where to look. To access this table you will need to use cpanel or equivalent host tool or use a plugin like WP Data Access that allows you to browse the tables.


Coupons
How Coupons Map to Xero
Xero doesn't have the concept of coupons and so we achieve it by using a product containing the discount. The code that gets automatically created in Xero is from the coupon description (first 30 letters). If you prefer to use a shorter alias then please use the Xero coupon code setting below.
Set Xero product code alias for Coupons
This enables Xero coupon/product codes to be reused to avoid a lot of clutter growing in your Xero account from coupon codes that are typically generated from custom coupon code plugins and often only used once. Note: the code can be any alphanumeric code and doesn't have to be XeroCode which is just an example.

Set-Up - Xeroom Taxes Tab
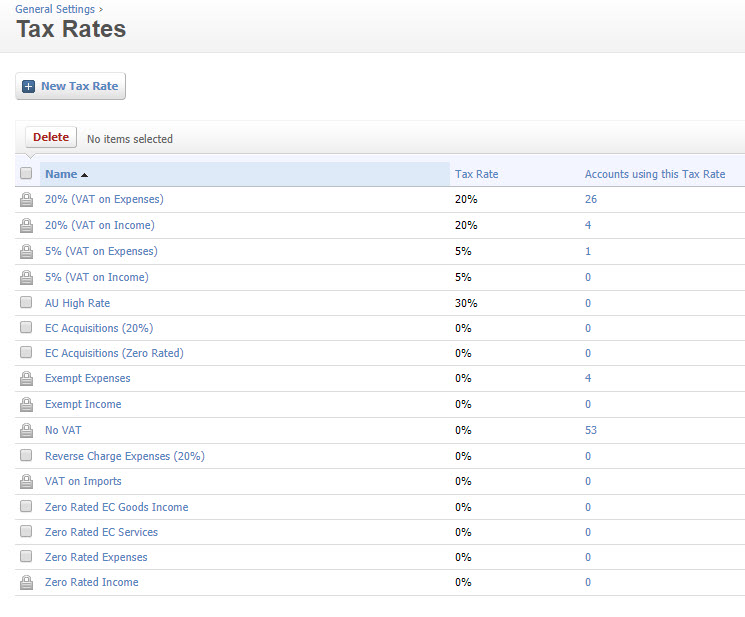
Select Tax Methods
Here you set the mapping of all your WooCommerce sales taxes ie VAT or GST to their equivalent Xero Tax Methods. A list of the available Tax Methods are given in the prepopulated list. There are two ways to do this, either simple or complex. Under Simple Tax Methods there is just one mapping for each of Standard Rate, Reduced Rate, Zero Rate and any custom tax classes that you have set up. Under Complex Tax Methods you are given the full details of each tax type set up in WooCommerce for each rate so exact mappings can be made. Tax methods in Xero are found under the advanced accounting menu option.
Important: Make sure that you run tests to ensure that you have your GST/VAT tax mapping correctly set up by placing test orders for different countries and products. Note that in WooCommerce taxes can be applied at a product level.


Products Inclusive/Exclusive of GST/VAT
By default prices are received by Xero and treated as tax exclusive with whatever GST tax is specified in Xero or copied across then added by Xero. This meant that if you keep your prices as inclusive of GST in Woocommerce then it would be added again on posting into Xero so it was added twice. Xeroom will pick up whatever the tax setting is in Woocommerce and handle the GST accordingly. Note that there is a setting in invoices in Xero to hard set this if you find that they are not showing correctly.
For further info on tax settings please go to https://xeroom.freshdesk.com/a/solutions/articles/77000536158.

Global Inventory Synch Tab
Xeroom provides the ability to synch inventory from Xero to WooCommerce or vice-versa for all tracked products on a schedule which can be daily, hourly or every 5 minutes. This is very useful if you are operating a physical shop with transactions going directly into Xero via a Point of Sale system that is decrementing inventory in real-time. Synchronizing the inventory into WooCommerce means that your online store is always up-to-date with inventory. Alternatively your physical shop may be only a small part of your business or open for short periods in which case you can make WooCommerce your inventory master. You can use this global synch in tandem with the individual product synch that occurs during checkout to give flexibility about how you manage your stock. For example the global synch could be Xero to WooCommerce and the checkout check is the other way to say facilitate back orders. Or you might have two online stores synching to the same Xero account.
Synch all products – Select which direction you want the synch to flow in.
Batch size – Xero strictly controls the no of API calls and rate so the synch data needs to be throttled to a rate that doesn’t risk breaching this. You can set up to 500 for the batch size and your products will be chunked in batches of 500. If you encounter issues with the synch not happening correctly then scale this back to 250 or 100 for the chunk batch size. Also if Xero encounters an error it will bomb out of the synch of the rest of the batch. In order to track down errors we have added the debug mode
Synch Now – This enables you to test the synch is working properly. The synch process runs a small cron job. Click the button twice to ensure that stockouts in WooCommerce get set as it takes a double run to do so.
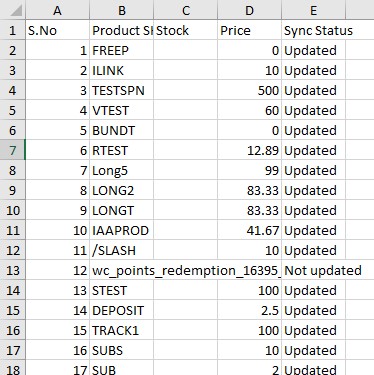
Log File – After synch an Excel log file is generated which shows the results of the synch. Check this file when testing to ensure no errors are occurring.
Errors – If the synch is not working then check the Xeroom Debug screen, your WooCommerce error log and that your cron jobs are running ok.
Debug Mode – Because Xero will drop the whole batch being processed if it encounters an error we have added this to enable troubleshooting. This will exclude the SKU's in the black list so that any suspect SKUs that have a problem can be removed from the picture. To troubleshoot set the batch to be 10 and then you can examine each log file for each batch of 10 to isolate the issue.

Setting Up Your Products to Synch Inventory
In order to synch inventory values the product codes in WooCommerce and Xero must match as these are the primary key - first please read this article to understand how the codes work https://www.xeroom.com/synching-inventory-xero-woocommerce/.
1. Set up SKU Product Codes in WooCommerce - The WooCommerce products are held in the database by post_id which will not link to the Product Codes in Xero. The SKU is the crucial product code that needs setting for all products that are being synched. These can be generated and organised in a spreadsheet and then uploaded into WooCommerce using the product import tool in WooCommerce (or one of the third party import tools). If you are setting up a virgin site and have these codes in Xero already then they can be downloaded into a CSV file and then cleaned up and imported into WooCommerce.
2. Set up Product Codes in Xero - If these do not exist in Xero then you need to create them. They can be uploaded via a CSV file or if you prefer can be copied over from WooCommerce using the Global Product Synch tab -NB: Insure that you do a test first on a demo version of Xero in case they are not correct as it can be a longwinded process to delete existing product codes in Xero that are the subject of transactions. In order to use inventory a product must be set to be tracked - NB: Once set to be tracked a product cannot be unset it can only be renamed.
3. Set the Stock Management flag in WooCommerce Products - This flag and associated settings on the screen below must be set for all products that you wish to use stock management with.

4. Upload Initial Inventory Values to Xero - It is best to upload these into Xero since it will use then for the opening balances without having to generate lots of superfluous purchase bills for the inventory adjustments. Once uploaded you are then ready to test the inventory synch using the Synch Now button with inventory going from Xero to WooCommerce. You need to press this twice to ensure that any stock-outs get corrected. Set the batch size to be 500 but if you are encountering issues with the batches stopping due to errors in the codes then reduce it,
4. Check the Synch Log File - After the synch completes check the log file for any errors and for results. Check that they are coming through correctly from Xero and correct any errors. Once it is running correctly then you can set the schedule for it to run. In this example all the blank stock figures are due to the Stock Management flag not being set in WooCommerce.

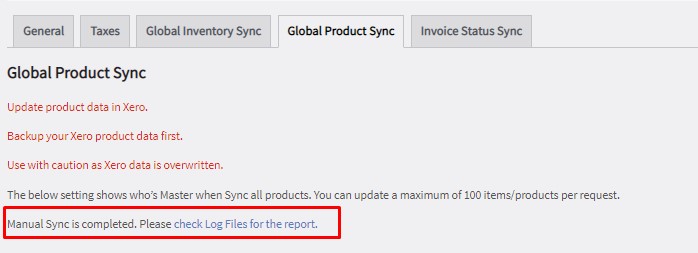
Global Product Synch Tab
This tab enables all your products to be hard synched between Xero from WooCommerce both as a one-off and run repeatedly on an automated schedule. A hard synch means that the products are updated permanently and not just temporarily (as it the default case) for the purposes of posting an order. Since the data kept against each product in WooCommerce and Xero are slightly different running this synch will not create exact replicas of the data in the other app. Any common data will be updated or if it doesn’t exist then created.
New build – In a new build situation you can use this to get an upload of all your existing products from WooCommerce into Xero or from Xero into WooCommerce. Note that this process creates new products in Xero with a status of untracked (ie can’t be used for inventory until they are switched to tracked) so can easily be deleted in Xero if wrong. They also are created with a default of zero cost. The product code, price and descriptions are the same.
Updates to existing builds – If you only want to update prices from one app to the other then just select price only. If you want to update both descriptions and prices then select the other radio button.
Selective Updates – The synch will only run for those products that are set to synch in the WooCommerce product xero setting. By using this flag you can create a set of products that need to synch and leave the rest untouched.
NB: VERY IMPORTANT – Use this feature with great caution and at your own risk as it will overwrite your existing Xero product data and Xero has no automatic backups. You should create backups of your Xero and WooCommerce product data first. Ensure that you know what you are doing and test first with a Xero demo account before attempting to use on your own live Xero account.

Synch completion success and log – The synch should only take 20 seconds or so to run and will give a completion message and create a log file that shows all the products that were updated.

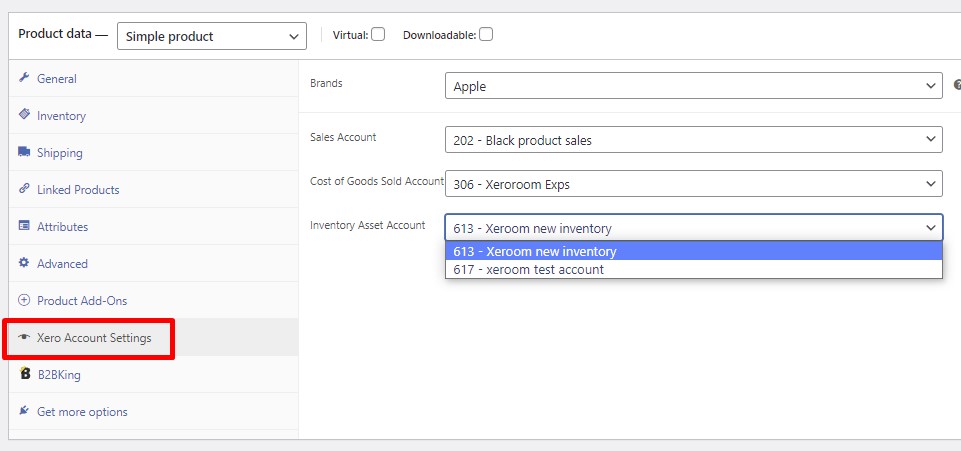
Product Level Attributes for Xero
Products can now be mapped into Xero at an individual product level of granularity. The key accounts that are used for a product in Xero can be set here in WooCommerce under the Product data where you will find a new tab Xero Account Settings. The setting is placed here to avoid poor performance when sending the data during checkout. The pick lists are all prepopulated with the account and descriptions however for a bulk load it is much more efficient to upload from a spreadsheet using a tool such as All-in-one-import plugin.

Tracking Category (example Brands) – Here the tracking categories that have been set up in Xero can be assigned to products.
Sales Account – Any setting here takes priority over the other sales account settings ie Product level > Product Category > General Xeroom Setting.
Cost of Goods Sold Account – Any setting here takes priority over the General Xeroom Setting for COGS account.
Inventory Asset Account – Any setting here takes priority over the General Xeroom Setting for Inventory Asset Account. The IAA tracks all the movements and transactions involving inventory and multiple IAA’s can be used to cover different classes or groups of products.
NB Important limitation: Once an IAA has been set to a product in Xero it becomes fixed and cannot be changed so Xeroom is not able to overwrite existing values in Xero with a different value from here. ie any existing tracked products in Xero MUST have matching IAA account values set in this tab. Furthermore no validation is performed by Xeroom to check if the IAA has already been set for a product or not.
Invoice Status Synch Tab
(Synching Xero payments back to WooCommerce orders)
When an invoice has been created in Xero by Xeroom and is then paid off in Xero, eg at month-end for payments-on-account customers, then the payment can be synched back to the order in WooCommerce using this feature. The orders are then shown in blue on the order dashboard as Paid in Xero status.

For instructions on how to set this up please go to setting up payments synch.
The WooCommerce Order Dash Screen
This screen is where you will manage your orders on a day-to-day basis. You can see all the orders listed and their Xero status in terms of order sent to Xero paid or unpaid, order credited, not sent or paid in Xero. The blue line around the box means that the invoice has been sent to the customer from Xero.
Filter Orders - You can filter all your orders by Xero status which is useful for dealing with exceptions or for month-end.
Bulk actions - There are 4 bulk actions that can be applied to all the orders that you have ticked at once. When you hit Apply you will see a running update for the job. Note: This should process at the rate of around 5 orders per minute as each has to be digested by Xero in turn. If the job appears to hang then check that you have cron jobs running ok on your server and WordPress site since this needs to be running for the bulk jobs to work.


Xeroom Modifications to the Order
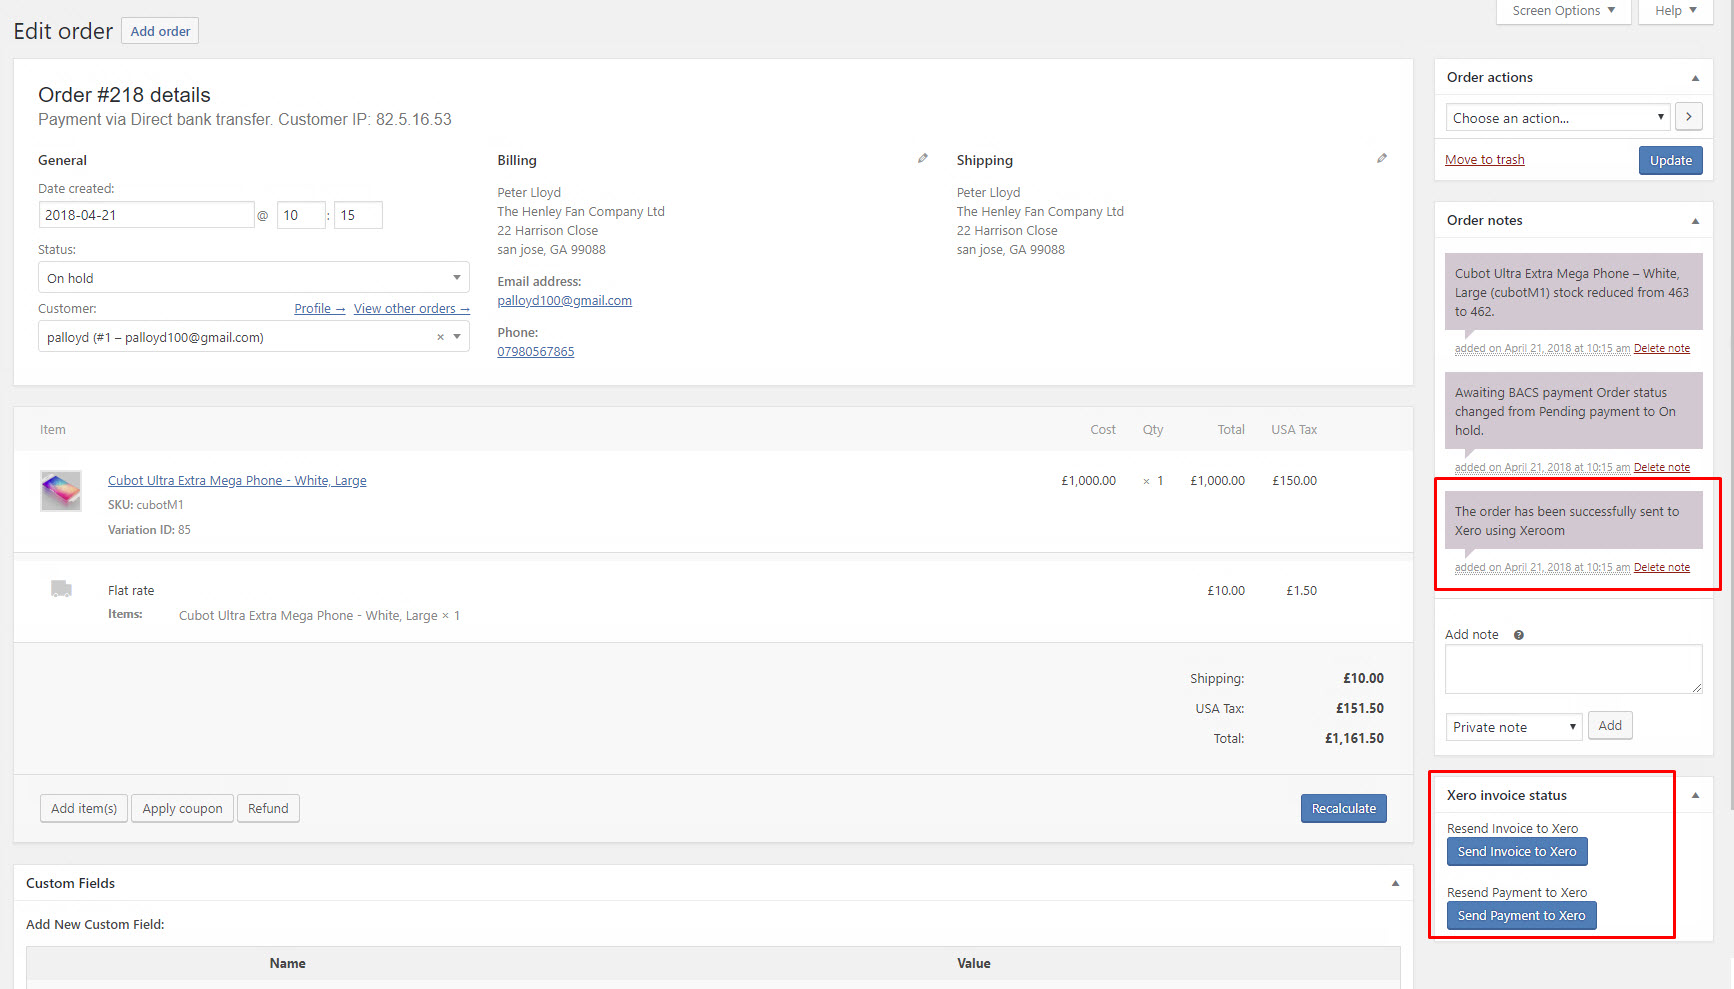
Order notes - Xeroom adds a commentary to the order notes for each action such as posting the order, adjustments to inventory, changes of status etc. This will also include errors from Xeroom but NOT errors fed back from Xero which will show on the screen at the time of posting the order and are recorded by Xeroom in the Debug page.

Action Buttons - In the bottom right hand side of the order is a box with Xeroom action buttons for sending the order to Xero.

Custom Fields - This shows some of the key meta data for the order generated by Xeroom.

Testing Your Integration
Test and Check Order Sending
Important: Once you have completed the setup and configuration run some test purchases from your site. Try to cover a number of scenarios and processes eg placing an order from an overseas country and checking the invoice results are correct. Check them both in Woocommerce in the orders dashboard and in Xero. A typical invoice of would look like below. If you encounter any issues then please look at the errors shown on the Xeroom Debug screen. This feeds back any error messages from Xero so it is the first place to look for things not being correct. The next place to check is your WooCommerce error log for any errors with the word “xeroom” in. This requires turning on – for details please see our Support page and section 6 explains how to do this https://www.xeroom.com/support/. If you are not able to resolve any errors found then please open a ticket by emailing support@xeroom.com with copies of your debug screen and any error log.

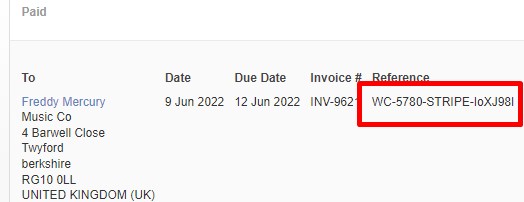
Check that the invoice figures match with the Woocommerce order that the order no reference is correct, the tax and shipping figures are correct and also go to the accounts themselves to ensure that the postings are correct. Also test with coupons and with and without shipping.
Test & Check Payments Sending
Complete the order in Woocommerce by clicking on the complete icon on the right of the order screen. The status will change to a tick on the left.

Then check that the payment has been posted correctly into the payment or bank account. This is how a typical Paid invoice would look with the free version.

This is how a completed Paid invoice would look showing the full address and no Xeroom reference.

Testing of Manual Posting of Of Orders and Payments to Xero
We have added 2 buttons to the bottom right of the Woo order screen so that if you enter any orders manually, ie not from the front-end shop, then they can be posted along with the payment to Xero.
Testing Refunds & Generation of Credit Notes
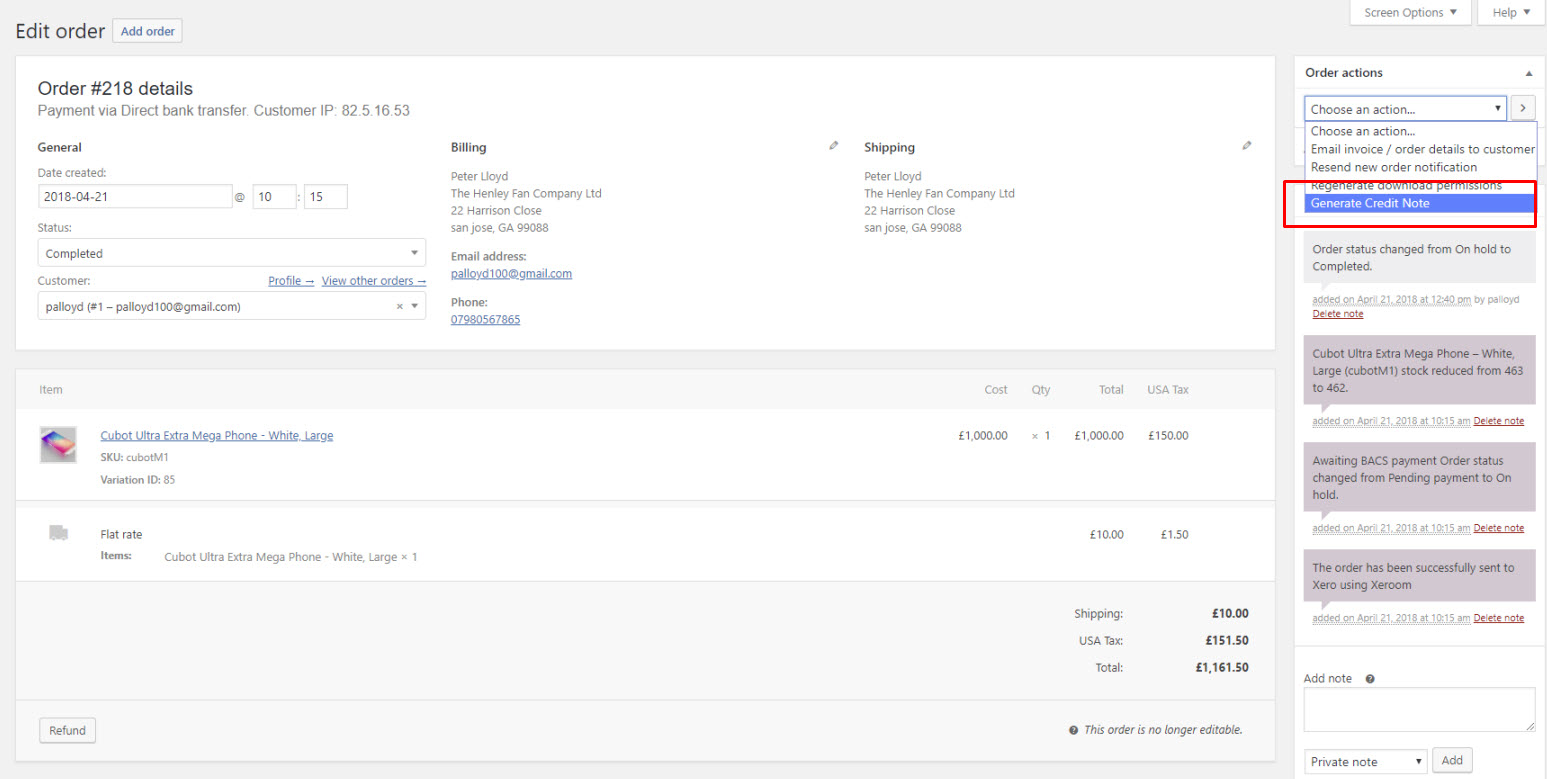
Once an order has been paid for and completed (which can be automatically done when the customer checks out and pays by card or PayPal – see the Autocomplete option to yes) it is then possible to automatically generate a credit note in Xero should the order be cancelled. Use the order actions dropdown menu in the top right hand side to do this.
Common Errors & Debugging
No invoice appears in Xero – The invoice should appear under the Invoices Awaiting Payment under Account -Sales-Invoices. If there is nothing there then there is an issue with your Xero connection – check the Debug screen in Xeroom.
Debug Screen – This will show your recent invoices and any associated errors that might have happened with them going back for 30 pages. It will also show if the order posting was successful or note. Always check here first if something is not working correctly. Note: Most of these error messages are fed back from Xero which although cryptic often give meaningful clues as to what is wrong. Please always send screenshots of the debug screen when contacting Support for help.

When are orders sent to Xero?
Orders are posted to Xero depending on the trigger set as described above. For immediate sending the triggers start during the checkout process when the customer completes the checkout successfully. This results in the action “woocommerce_checkout_order_processed”. A note is made on the order in Woo that it has been sent to Xero.
When are payments sent to Xero?
Payments are sent either manually or automatically as covered above. The automatic trigger sends to Xero when the payment is complete either by an instant method such as card or PayPal or when a Bank Transfer occurs. This is from the action “woocommerce_payment_complete”.
Can I synchronize existing orders?
Yes you can use the Bulk Data Loader feature – see the separate user instruction page on the menu above.
What happens if the tax rate is not set up correctly?
It is important that setup tax in WooCommerce matches the corresponding setup tax in Xero because Xero validates line totals. If Xeroom cannot find a matching tax rate then it will not make an error but create a new one using the % sent across but will not have a name and will not be treated correctly in Xero.
What happens if an invoice fails?
If you have tested everything then this should never happen. You can check whether the order has been posted or not by looking at the order notes in Woo. If it does then it is most likely a connection issue so check debug for messages to confirm this and if so try reauthorizing the connection and if that fails then create a new set of Xero keys. Common causes of this are changing your pemalinks (which is why we added the URI generation for your site) or changes in the Xero permissions of the person who created the Xero app.
Why aren’t my payments being exported?
If invoices are being created, but payments are not being created, make sure that the Xero account that is used for “Payment Account” has “Enable payments to this account” checked in the Edit Account Details popup.
Why am I getting duplicate invoices in Xero?
This should not happen as we set a flag whenever an invoice is posted to prevent it being posted again accept if the Repost invoice option is used, in which case it will give it the same invoice no but with an A,B,C suffix. If you have more than one installation of Xeroom then this can cause problems with one version sending the invoice and the other sending the payment. Ensure that you only have one copy of Xeroom installed in a directory called \xeroom\ and nothing else.
Debug shows o oauth_problem=….
This means that WooCommerce is not communicating with Xero due to the Xero API keys being wrong or expired or the security token needs resetting by a reauthorisation of the Xero app.
Error sending invoices: “Item code ‘xxx’ is not valid”
If you get the following error in the order notes related to “Item Code”:
ERROR creating Xero invoice: ErrorNumber: 10 ErrorType: ValidationException Message: A validation exception occurred Detail: Item code ‘XXXX′ is not valid
Please check your Xero configuration and make sure the inventory item SKU is setup correctly. Here’s a doc on how to set up inventory items in Xero.
Error sending invoices: “TaxType code ‘xxx’ cannot be used with account code ‘yyy’
You may see the following error in the order notes:
ERROR creating Xero invoice: ErrorNumber: 10 ErrorType: ValidationException Message: A validation exception occurred Detail: The TaxType code ‘xxx’ cannot be used with account code ‘yyy’.
The Xero shipping account that is set in Xeroom is not one of “Revenue” type in Xero. Go to Xero and COA and edit it to change the account type or else create a new one of the correct revenue account type.
Error for payments
ERROR creating Xero payment. ErrorNumber:10| Error Message:Account type is invalid for making a payment to/from
Make sure that the account you specified for “Payment Account” in the Xero settings has “Enable Payments To This Account” checked in Xero.
Error: XERO: Invoice not created. OAuth Error: token_rejected | The
organisation for this access token is not active
This error happens when the API application was created with the wrong organization. Go to https://api.xero.com/, Click on My Applications, then the application you created to connect your WooCommerce site. If the Selected Organization is “Demo Company” you’ll need to delete this application and recreate another one.
Other errors – Please search our knowledgebase in the help portal as we are adding all new errors encountered into there.
Frequently Asked Questions
Q: Is Xeroom available as a free version?
A: No we only offer the full version under a 7-day money back guarantee. If you decide it is not for you for any reason then just email us and we will cancel your licence and refund you. We do not refund any installation services.
Q: Why do I need a xero.com application?
A:The Xero application is essential in order to provide an API connection without which the Xeroom plugin cannot work. This enables secure and correct communications to take place between your Xero account and your Woocommerce site.
Q: I already have a Xero account, what do I need to do next?
A: You have to create a new application by visiting this link http://www.app.xero.com/ and follow the instructions above.
Was this article helpful?
That’s Great!
Thank you for your feedback
Sorry! We couldn't be helpful
Thank you for your feedback
Feedback sent
We appreciate your effort and will try to fix the article